
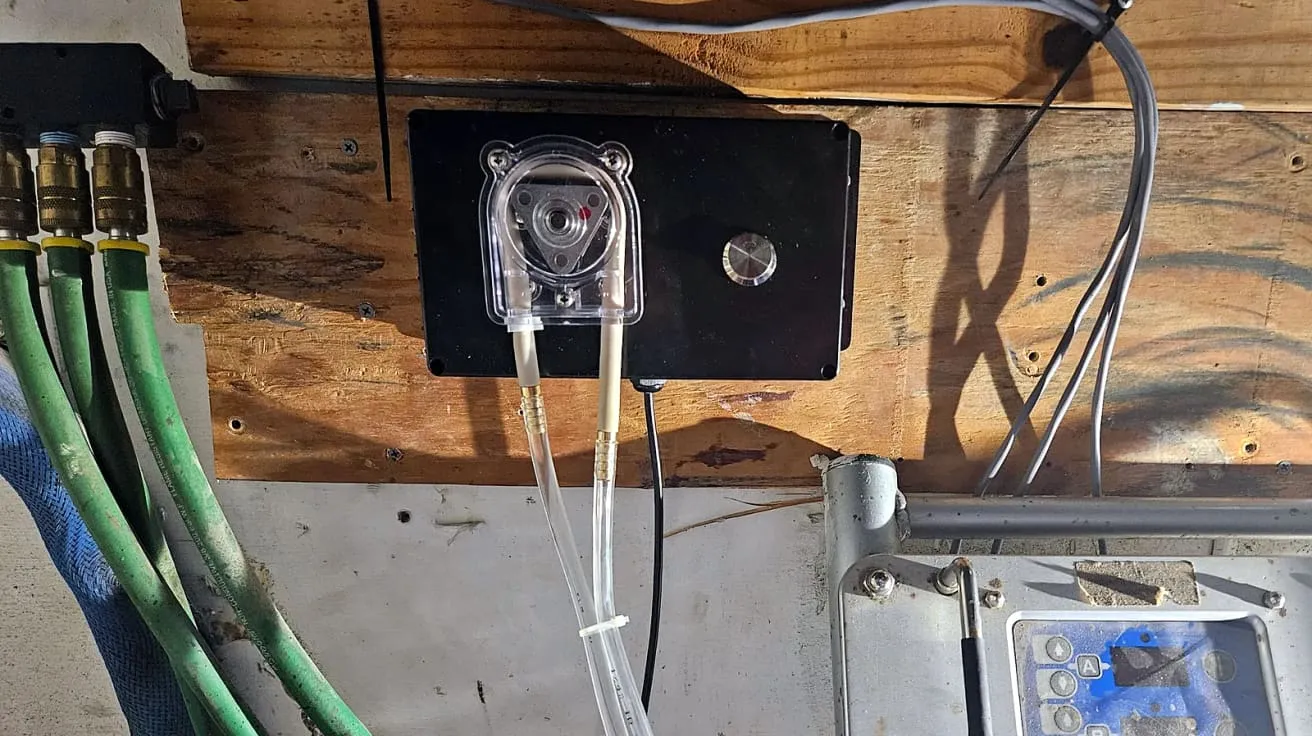
Newer Reactor 3 E-20s ship with a lube pump that circulates throat seal liquid (TSL) through the A-side wet cup. Older E-20s don’t. Older versions moved TSL with a pair of check valves in the TSL bottle’s lines, fitted in opposite directions, so the stroke of the pump rod did the pumping. That’s a recipe for disaster. Those two small check valves live in ISO-contaminated fluid, and when one sticks, circulation stops with no warning. On top of that, fluid only moves when the rod moves, so the TSL sits still whenever the rig is idle.
There’s a timer-based kit on the market for older machines, and it costs about $1,000. It uses a small peristaltic pump that has to run very fast to move enough fluid, and it runs a few seconds on, then pauses. I didn’t want that. I wanted slow and steady: fresh TSL moving across the rod the entire time the reactor is on. Mine cost about $300 in parts. This post covers how I built it, what it cost, and what I learned along the way. If you’d rather not build the pump box, there’s a ready-made version that plugs into an outlet, for about $150 more.
Why continuous circulation
The wet cup’s job is to keep isocyanate on the displacement rod from meeting air. ISO that sits in contact with moisture crystallizes, and those crystals are abrasive. That’s what wears throat seals. Left to build up, it can also cause mechanical binding and a catastrophic failure that costs many thousands of dollars to repair. Moving TSL across the rod carries that film away before it can build up.
Graco’s own Reactor 3 manual describes the factory system this way: the lubrication pump “circulates TSL through the wet cup to wash isocyanate film from the displacement rod.” That’s the whole idea. My version does the same job with a closed loop: bottle, pump, wet cup, back to the bottle.
Running it continuously, instead of on a timer, has a few advantages:
- No dosing logic. It’s a loop. Whatever goes into the cup comes back out to the bottle.
- The rod never sits in stagnant fluid. Idle, warming up, or spraying, the TSL is always moving.
- Nothing to adjust. No run time, no pause time, no counter.
- No timer. Leaving it out makes the build simpler, cheaper, and more reliable: there’s no controller to buy, wire, or fail.
The trade-off is tube wear while the rig is powered but not spraying. At 15 RPM that’s a non-issue. Peristaltic tube life is driven by the number of roller passes, not hours on the clock, so speed is everything.
So how long will the drive tube last? Saint-Gobain rates Norprene tubing at about 500 hours in a similar 3-roller pump running at 600 RPM. This pump turns at 15 RPM, 40 times slower, so the tube should last roughly 40 times longer: about 20,000 hours, or around 10 years at 2,000 hours a year.
That’s a rough estimate, not a guarantee. Contamination and age will probably retire the tube first. Either way, you’ll change TSL many times before you change the drive tube.
The design at a glance
- Pump: ANKO A302B-15. A 24 V brushless peristaltic pump with a Premium (thick-wall) tube class and a 15 RPM gearbox. Slow speed, big tube, long life.
- Flow: About 33 mL/min, ANKO’s published figure for this pump at 15 RPM with a 3/16 in bore tube. That’s plenty for a circulation loop.
- Power: A Mean Well 24 V supply inside the reactor cabinet, fed from the load side of the main disconnect through two fuses. The pump runs whenever the reactor is on.
- Control: One illuminated on/off switch on the pump box. Light on, pump running.
- Plumbing: 1/4 in clear lines, so you can see flow and contamination at a glance. A mesh strainer sits on the bottom of the TSL bottle. The old bottle, its lines, and its check valves are discarded.
Parts at a glance
The full parts list with suppliers and pricing is at the end of the post.
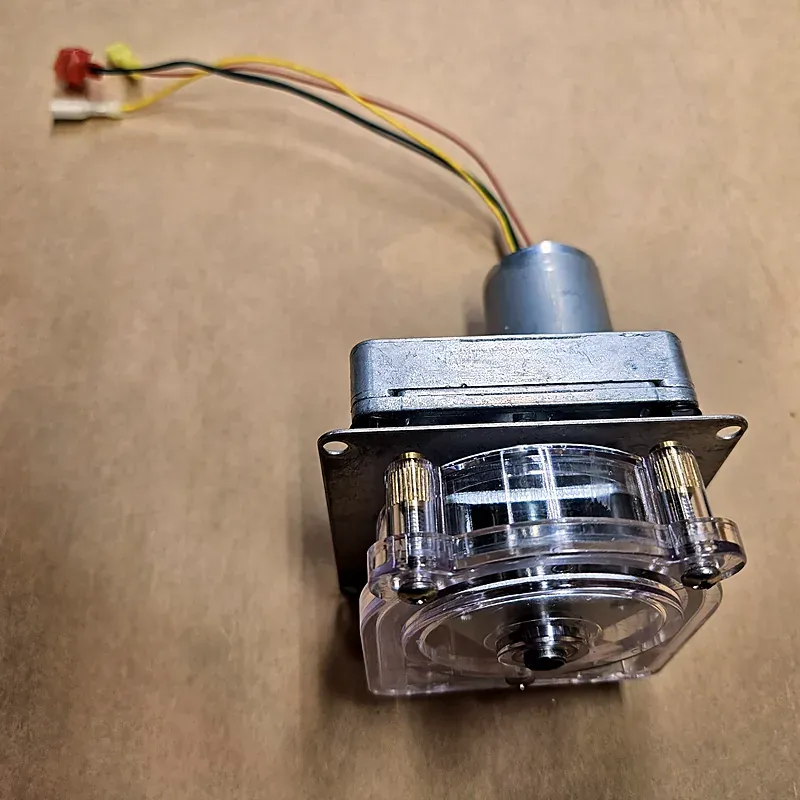
ANKO A302B-15 pump
24 V brushless, 15 RPM
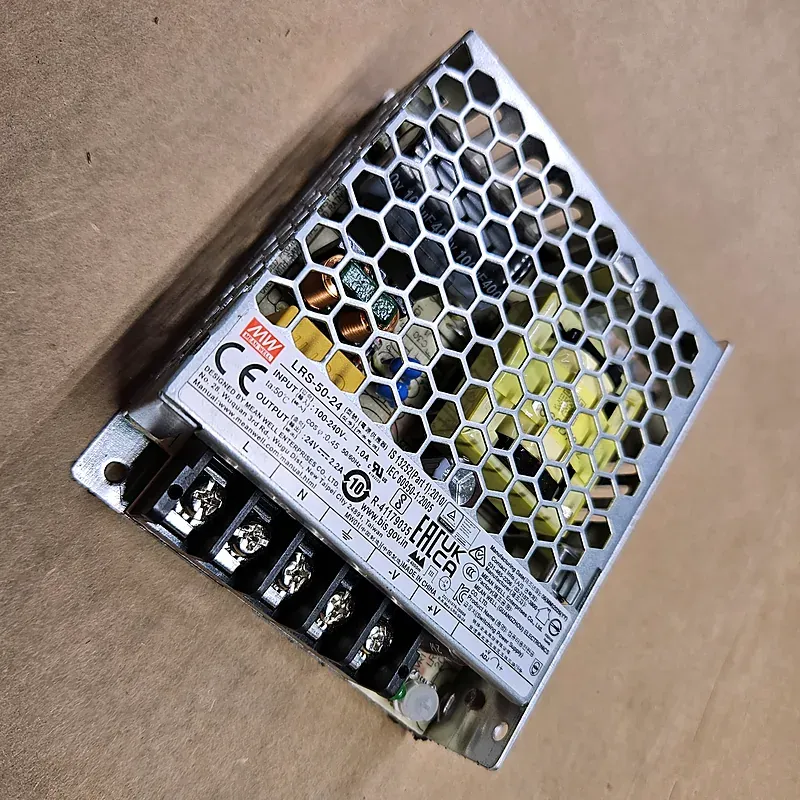
Mean Well LRS-50-24
24 V, 2.2 A supply
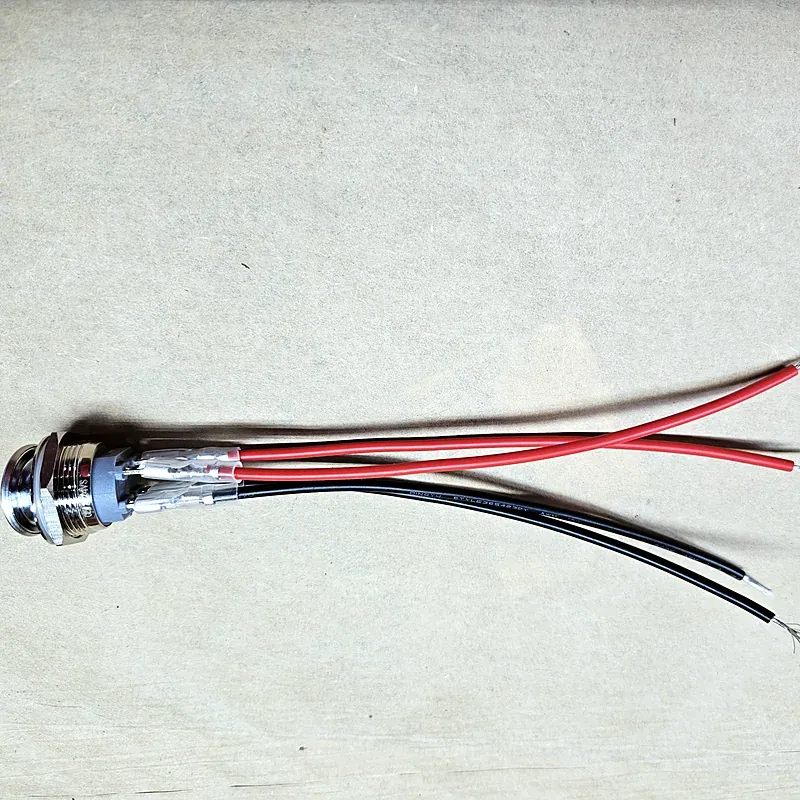
22 mm illuminated switch
2NO, 12–24 V LED
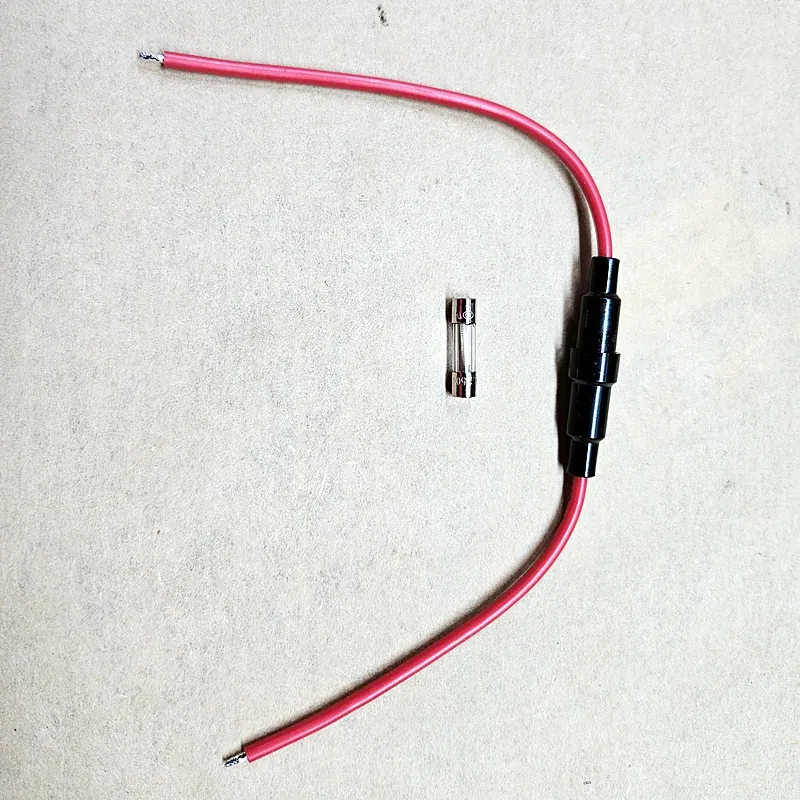
Inline fuse holder
5×20 mm, 2 A slow-blow
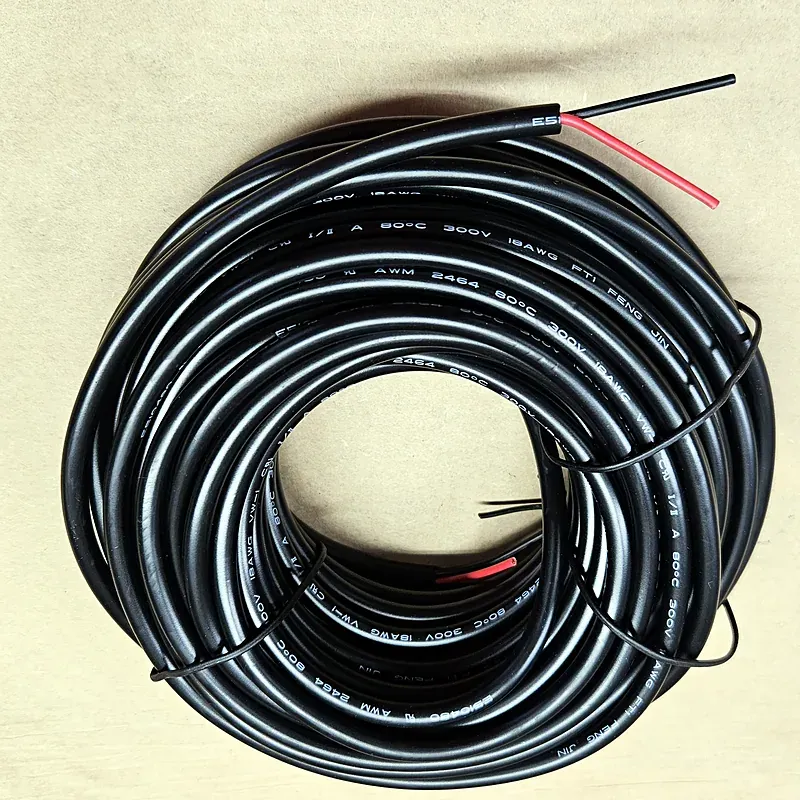
2-conductor 18 AWG cable
Supply to pump box
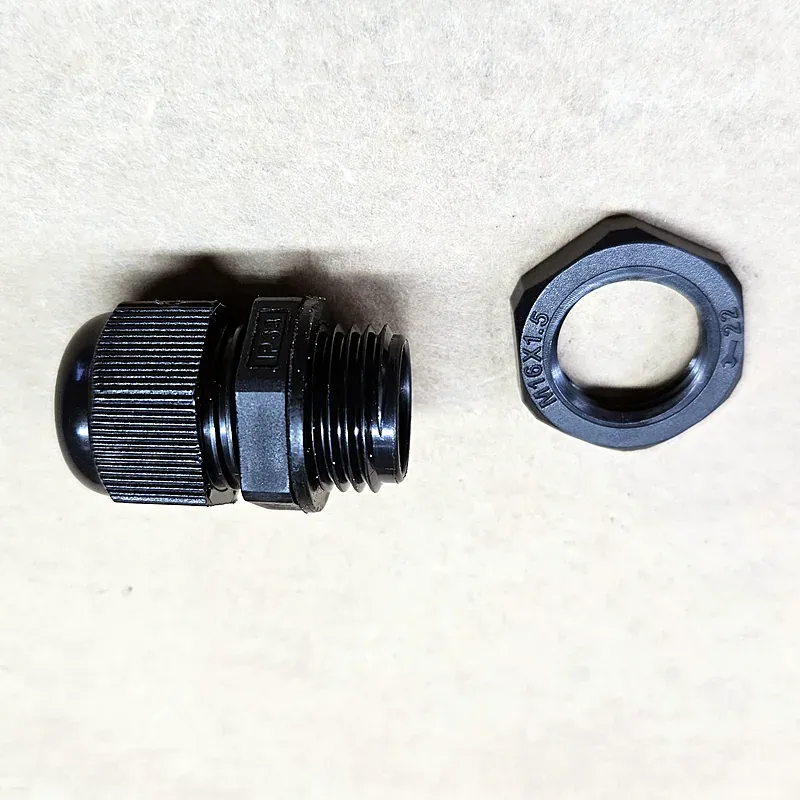
Cable gland
Seals the cable entry
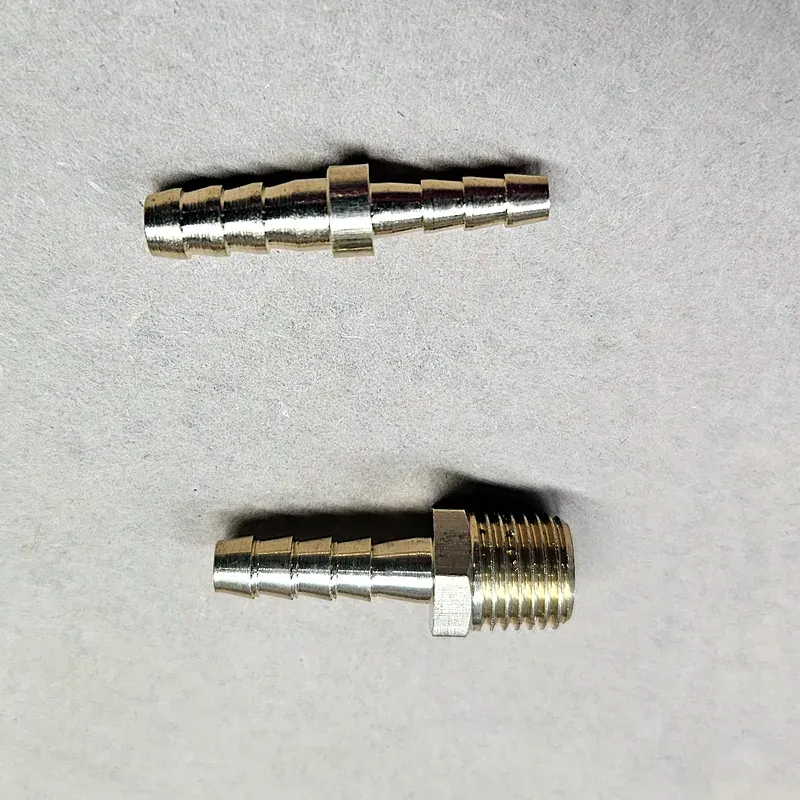
Brass barbs
Mender and strainer barb
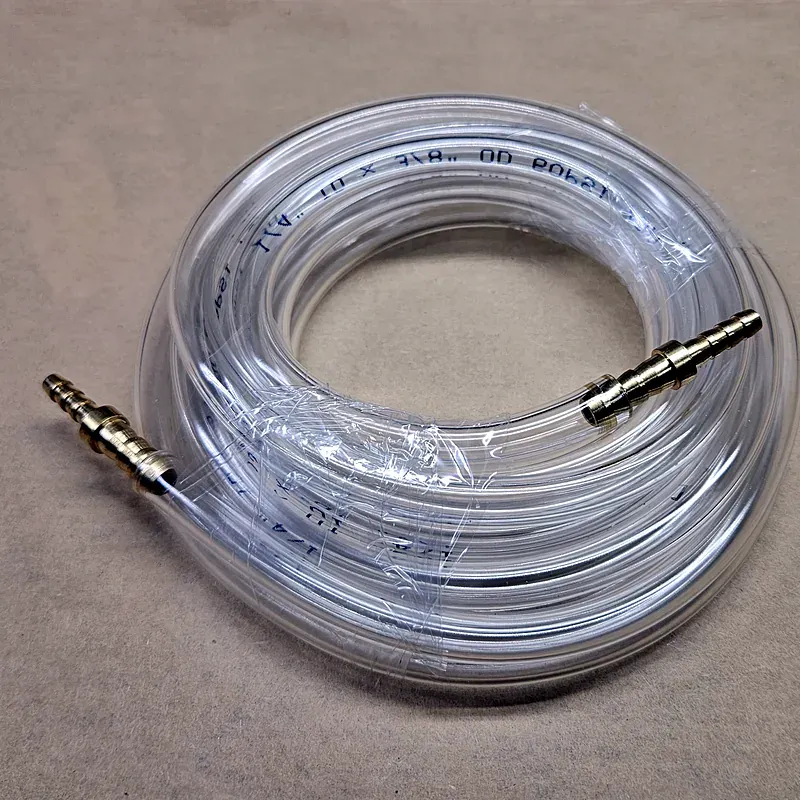
1/4 in ID clear PVC
Suction, feed, and return
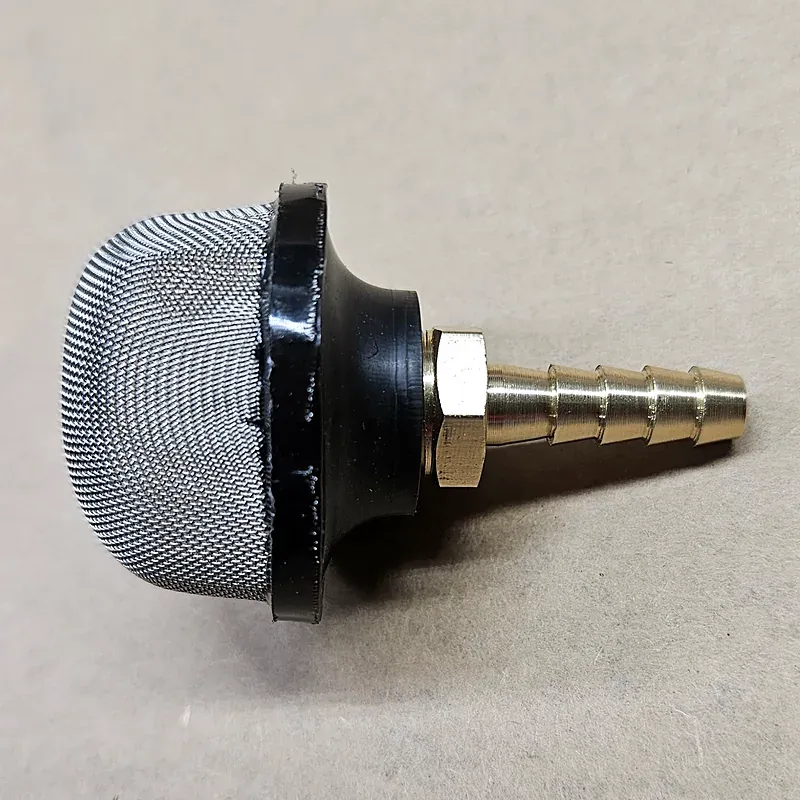
Mesh suction strainer
Fitted with 1/4" × 1/4" MPT barb
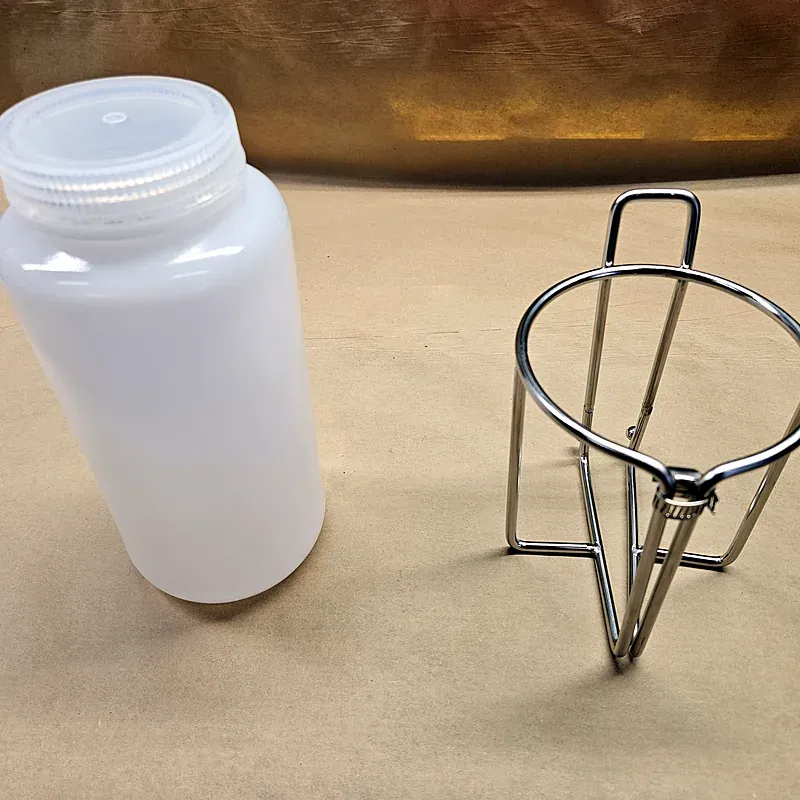
Bottle and holder
Wide-mouth HDPE, stainless rack
Option: buy the pump ready-made
Steps 1 through 6 build the pump box and wire its power. If you’d rather skip all of that, ANKO sells the same pump ready to run: the FSP A300. It comes in its own housing with an on/off switch and a built-in power supply, and it plugs into a standard outlet. It’s UL listed and has a 3-year warranty.
- What to order: Premium tubing class, 15 RPM (ANKO part FSP-A30215). That’s the same pump head, tube class, and speed as the A302B-15 in this build, so the flow and tube-life numbers above still apply.
- Which tube to use: it comes with three Norprene drive tubes, 1/4, 3/16, and 1/8 in bore. Use the 3/16 in tube. The barb menders and the spare tube in the parts list are sized for it.
- Power: a 100–240 VAC supply inside the housing and a 6 ft cord with a standard grounded plug. Nothing gets wired inside the reactor’s electrical cabinet.
- Cost: $399 for the pump, about $460 with the plumbing parts. That’s about $150 more than building it, and still less than half the price of the timer kit.
With the pump in hand, skip to Step 7 and plumb the loop. One difference in use: an outlet-powered pump doesn’t shut off with the reactor. Turn it off at its switch at the end of the day, or plug it into an outlet that’s only live when the rig is running.
Step 1: Lay out and drill the lid
The pump mounts through the lid of the enclosure, with the motor and gearbox inside and the pump head outside. The switch goes in the same face. I laid out the pump’s shaft hole and four mounting holes from the pump’s mounting plate, then drilled a 22 mm hole lower down for the switch.
Put the pump head toward one end, so the tube ports hang straight down when the box is mounted. Leave room around the head to open it for tube changes.
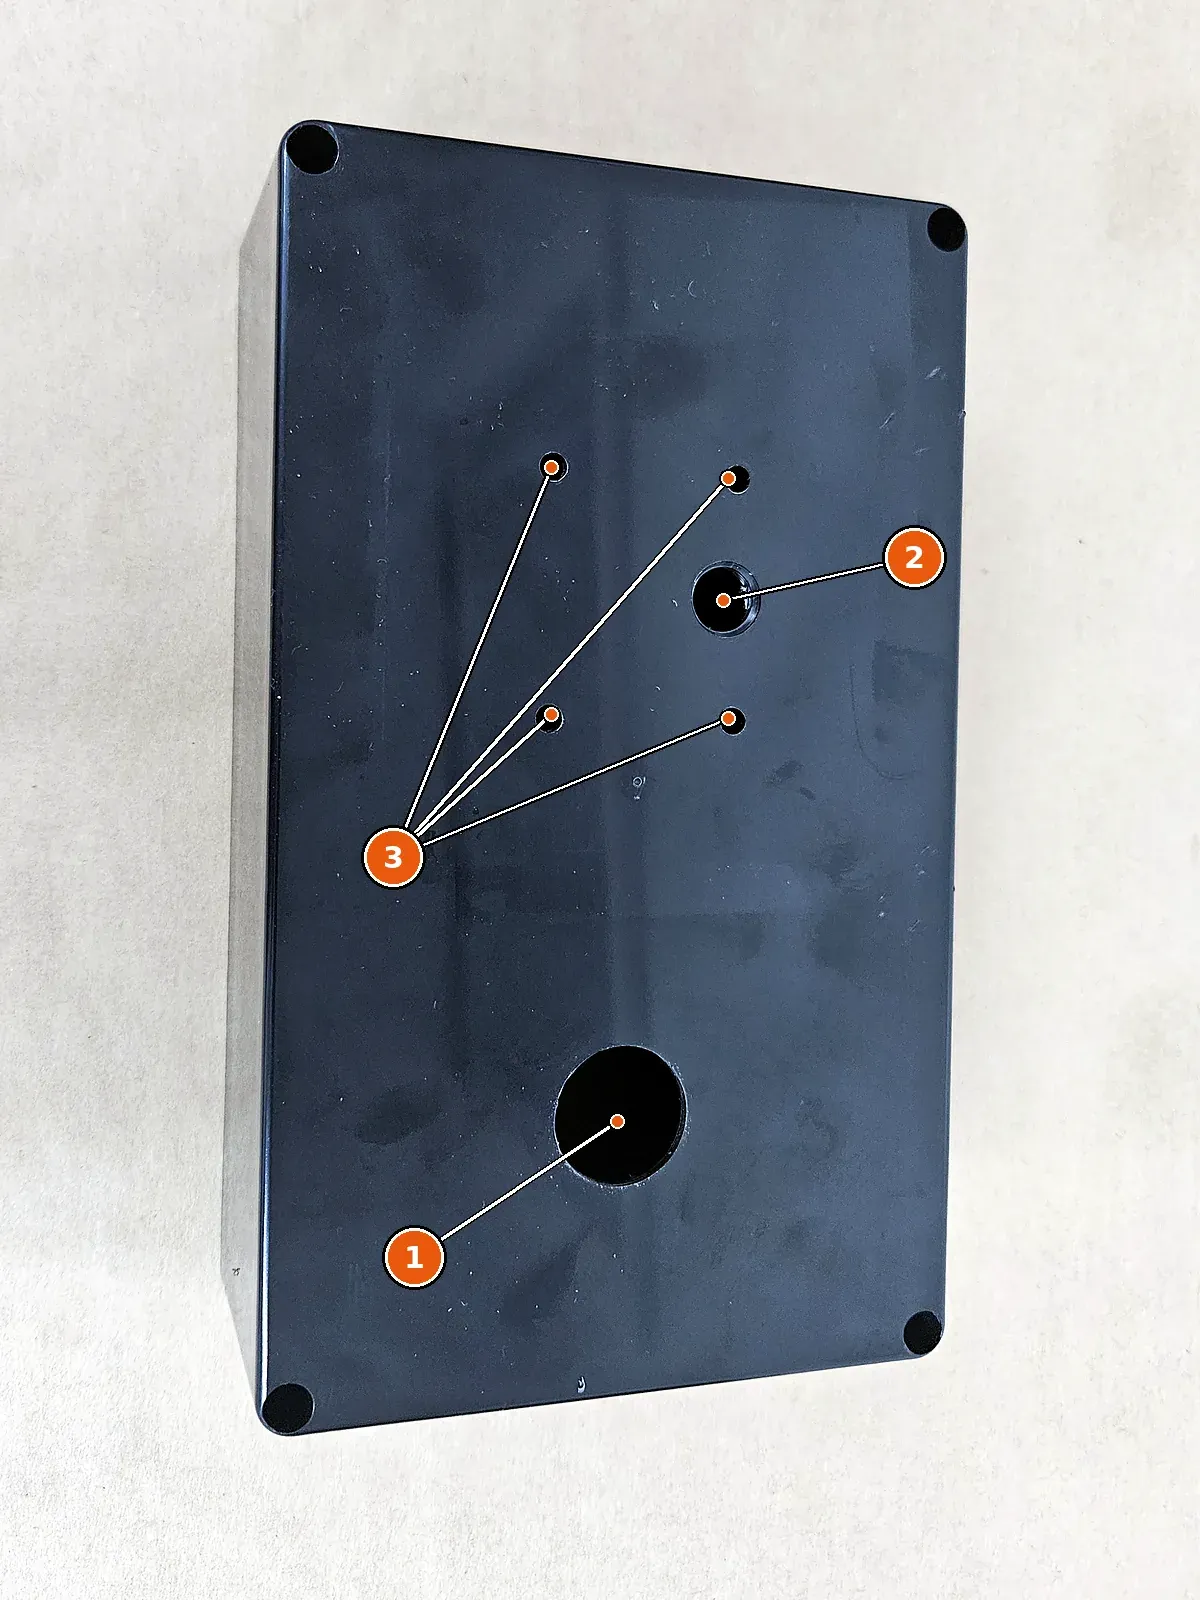
Lid drilled for the pump and switch.
- 1. 22 mm hole for the illuminated switch
- 2. Pump shaft hole
- 3. Pump mounting holes, from the pump's mounting plate
Step 2: Install the cable gland
The 24 V cable enters through a nylon cable gland in the side of the base. Put the gland on the bottom side of the box as it will be mounted, so water and drips run off it instead of into it.
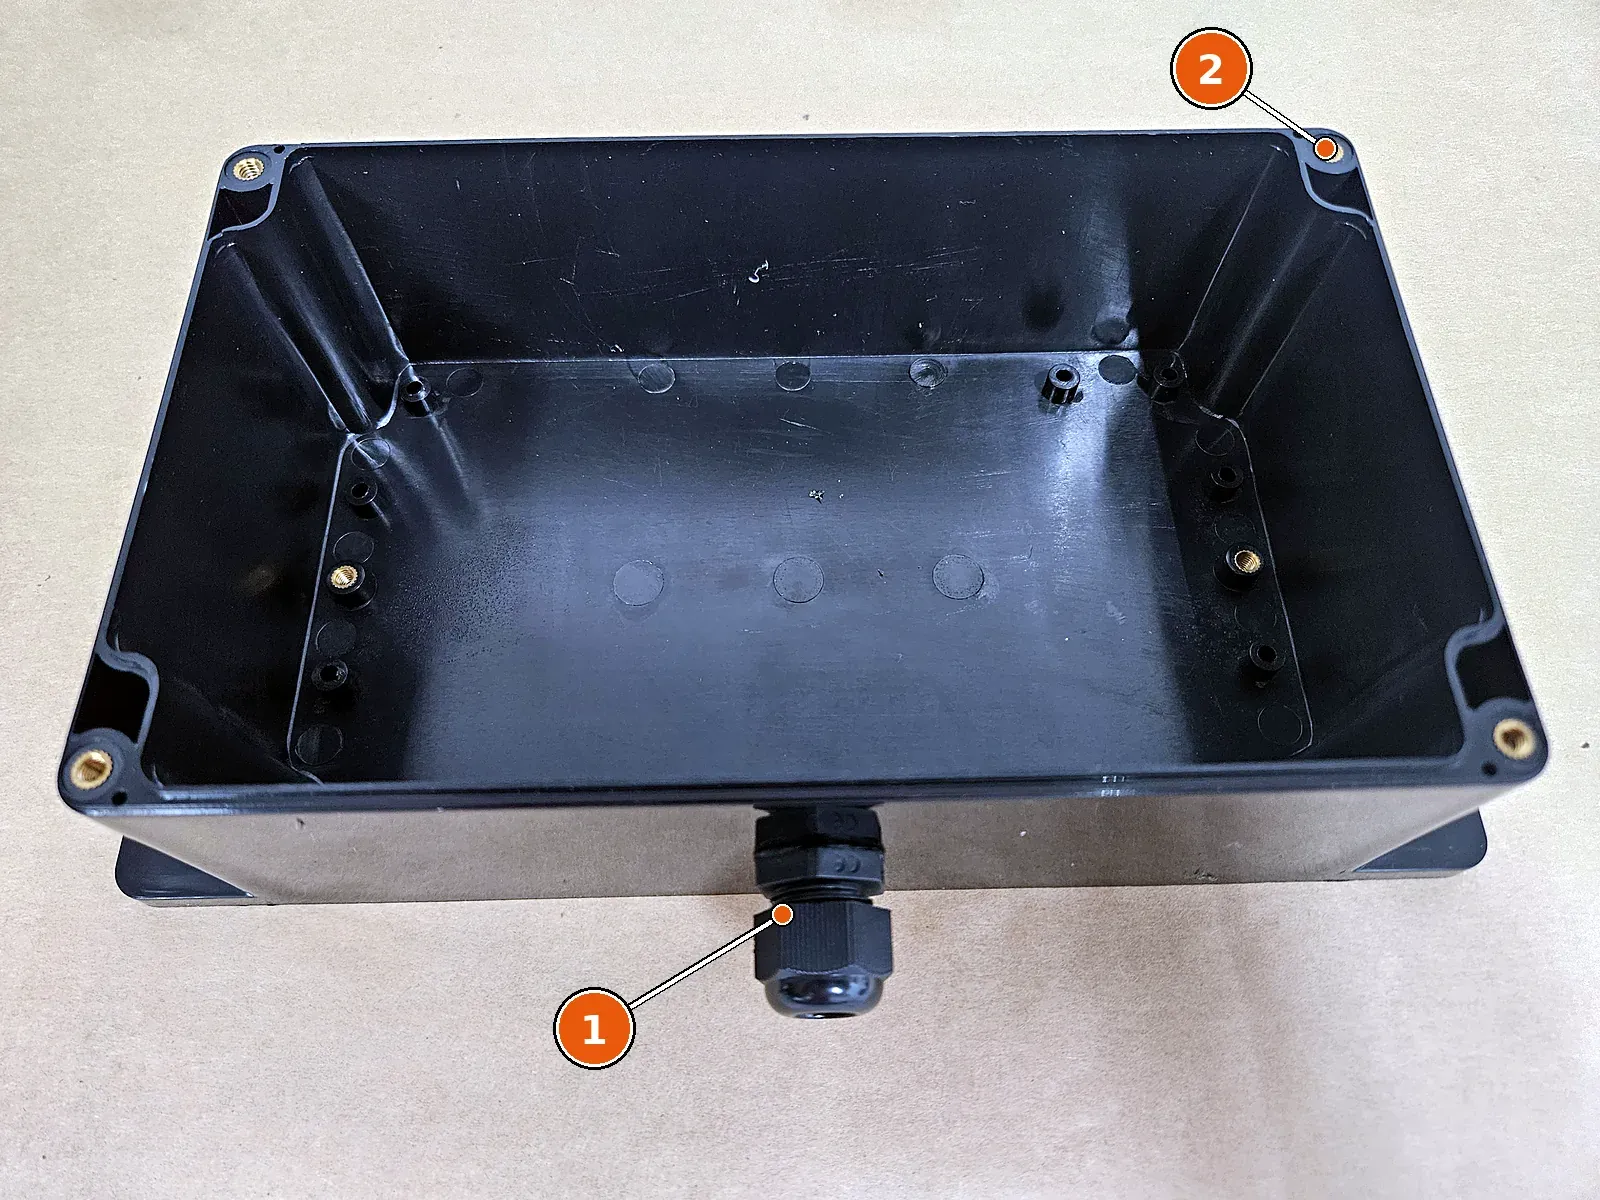
Cable gland in the enclosure base.
- 1. Cable gland, on the side that faces down when mounted
- 2. Threaded inserts for the lid screws
Step 3: Mount the pump and switch, and run the cable
Bolt the pump to the lid and install the switch. Feed the 2-conductor cable through the gland and leave enough slack to open the lid with everything still connected. I put insulated spade terminals on the leads so the lid can come off without cutting wires.
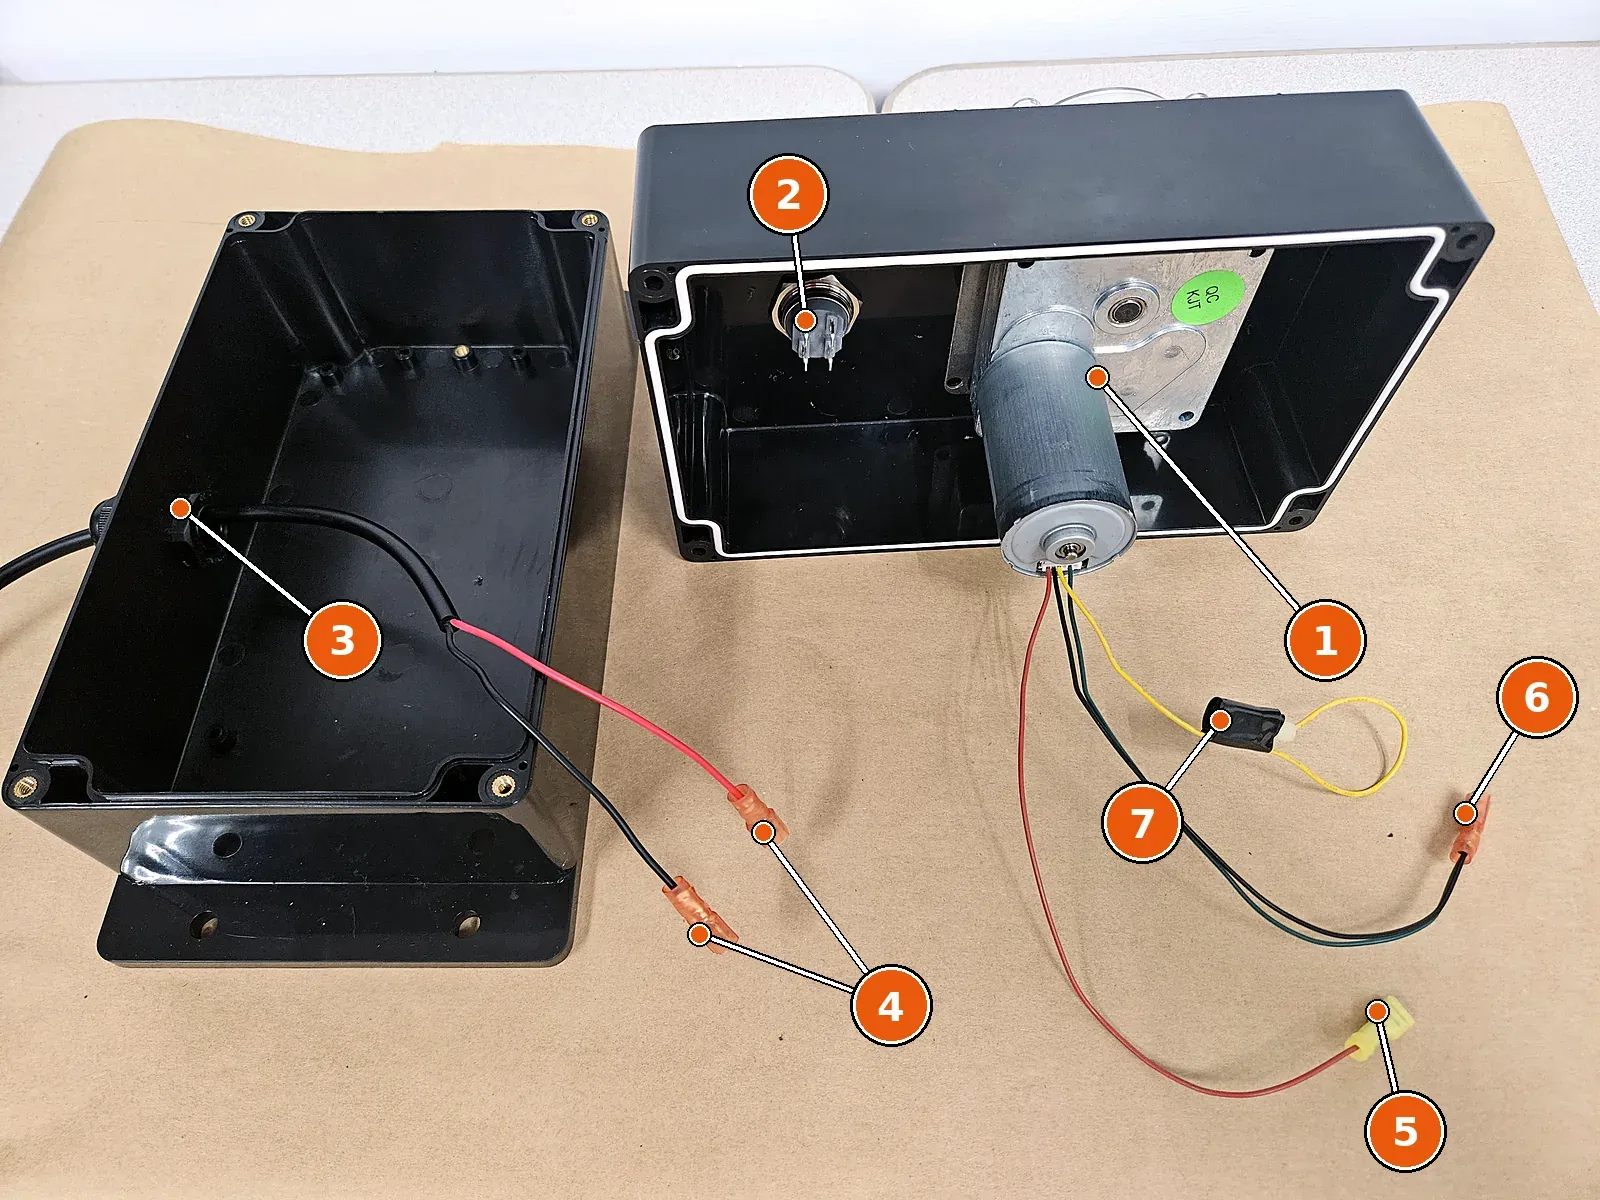
Pump and switch mounted to the lid, with the supply cable through the gland.
- 1. Pump gearbox and motor, inside the box
- 2. Switch body
- 3. Supply cable through the gland
- 4. Supply leads, red (+24 V) and black (−V)
- 5. Pump red lead (+24 V)
- 6. Pump black and green leads, joined on one terminal
- 7. Pump yellow lead, insulated and not used
Step 4: Wire the switch and pump
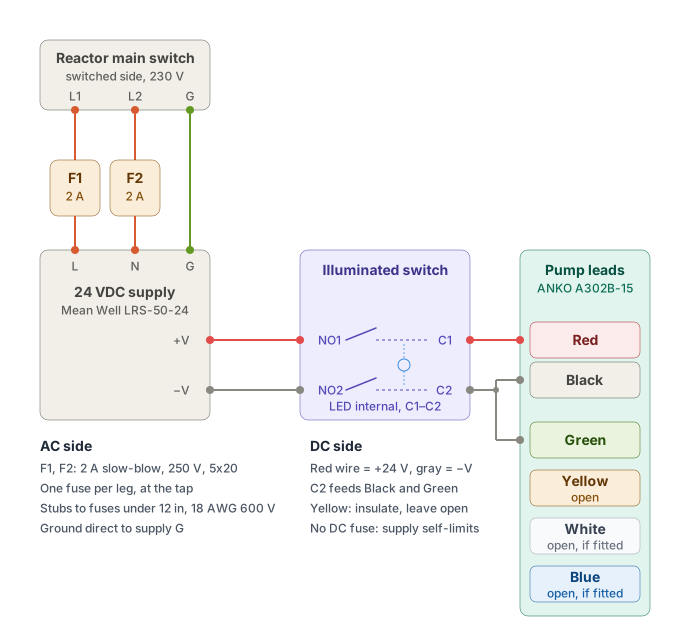
The switch is a double-pole, normally open switch with a built-in LED. Wired this way, it breaks both +24 V and −V, and the LED lights only when the pump has power.
- Supply +V to switch NO1, supply −V to NO2
- Switch C1 to pump Red
- Switch C2 to pump Black and Green
Green must go to ground. On ANKO’s brushless motors, green is the PWM speed input. Tied to ground, the motor runs at full rated speed (15 RPM on this one). Leave it floating and you’re guessing.
Yellow sets direction. Left open, the motor turns clockwise, which was the right direction for my plumbing. Insulate it and leave it open. ANKO’s lead chart also lists White (brake) and Blue (tach output) for this motor family. If yours has them, insulate them and leave them open.
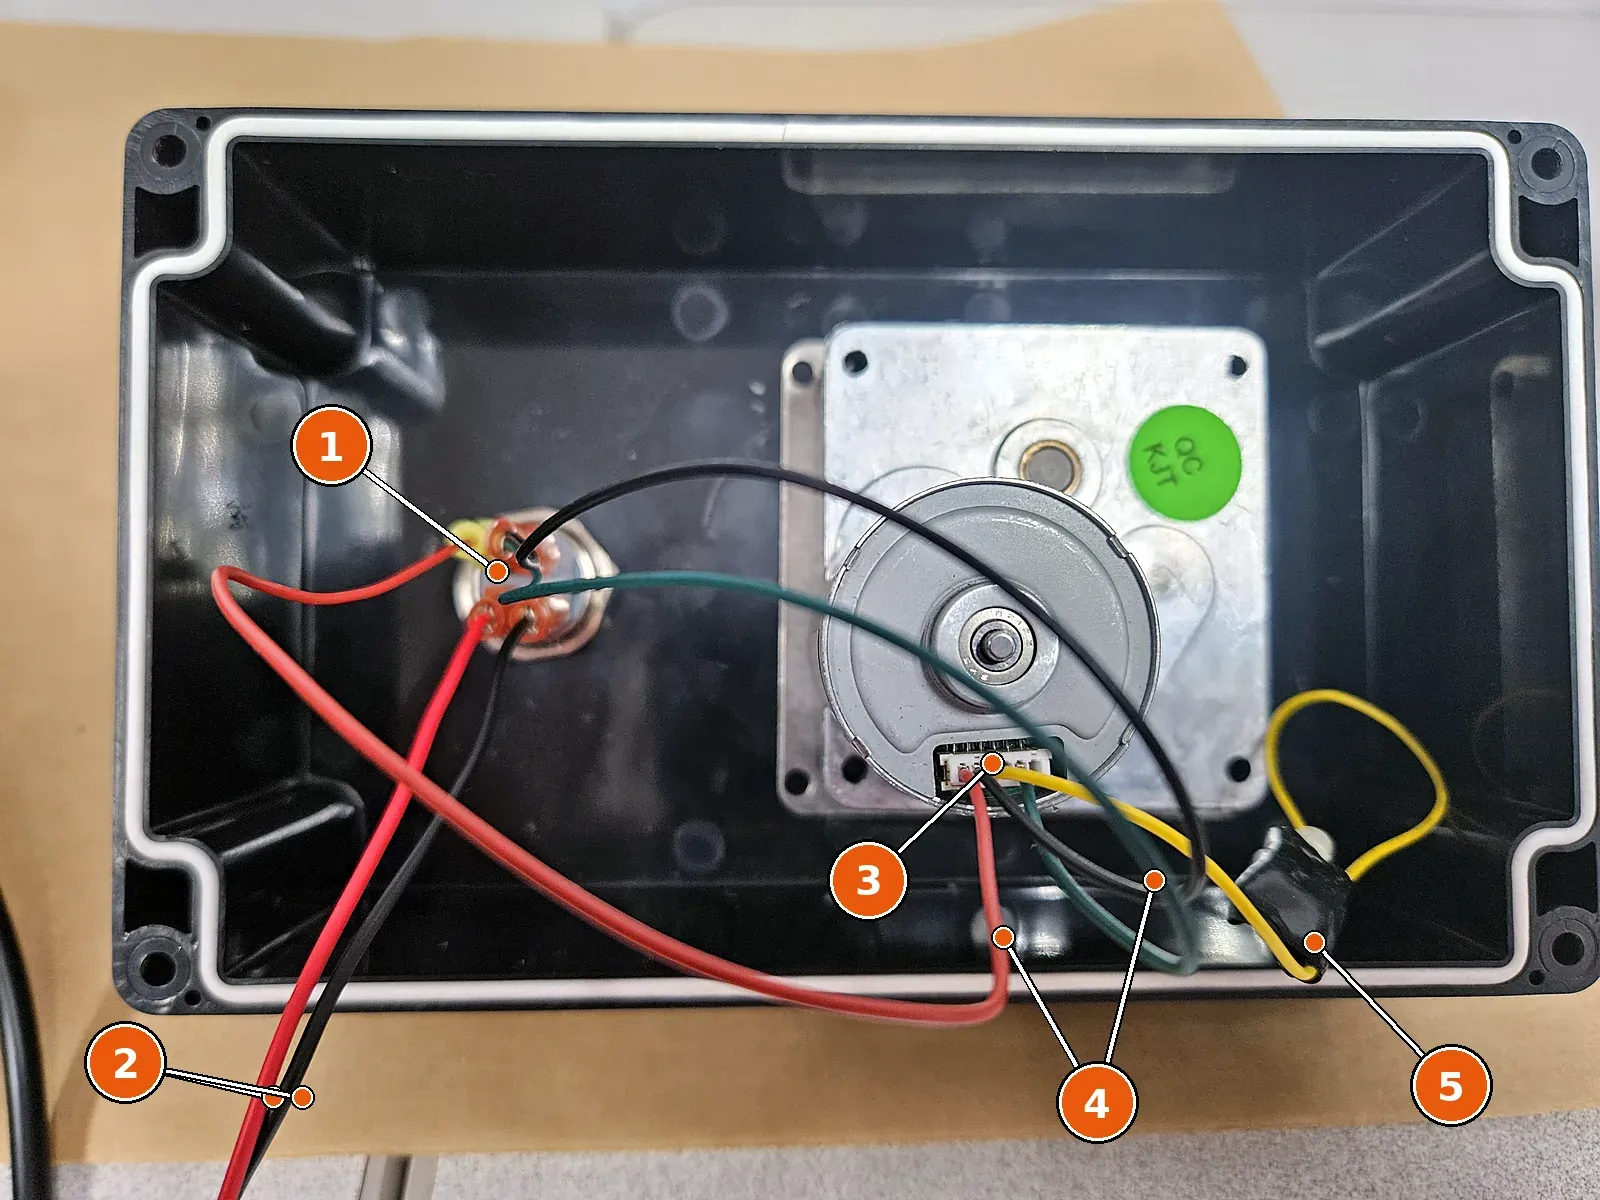
Inside the box, fully wired.
- 1. Switch terminals
- 2. Supply cable from the reactor cabinet
- 3. Pump motor connector
- 4. Pump leads to the switch: red to C1, black and green to C2
- 5. Yellow lead, insulated and tied back
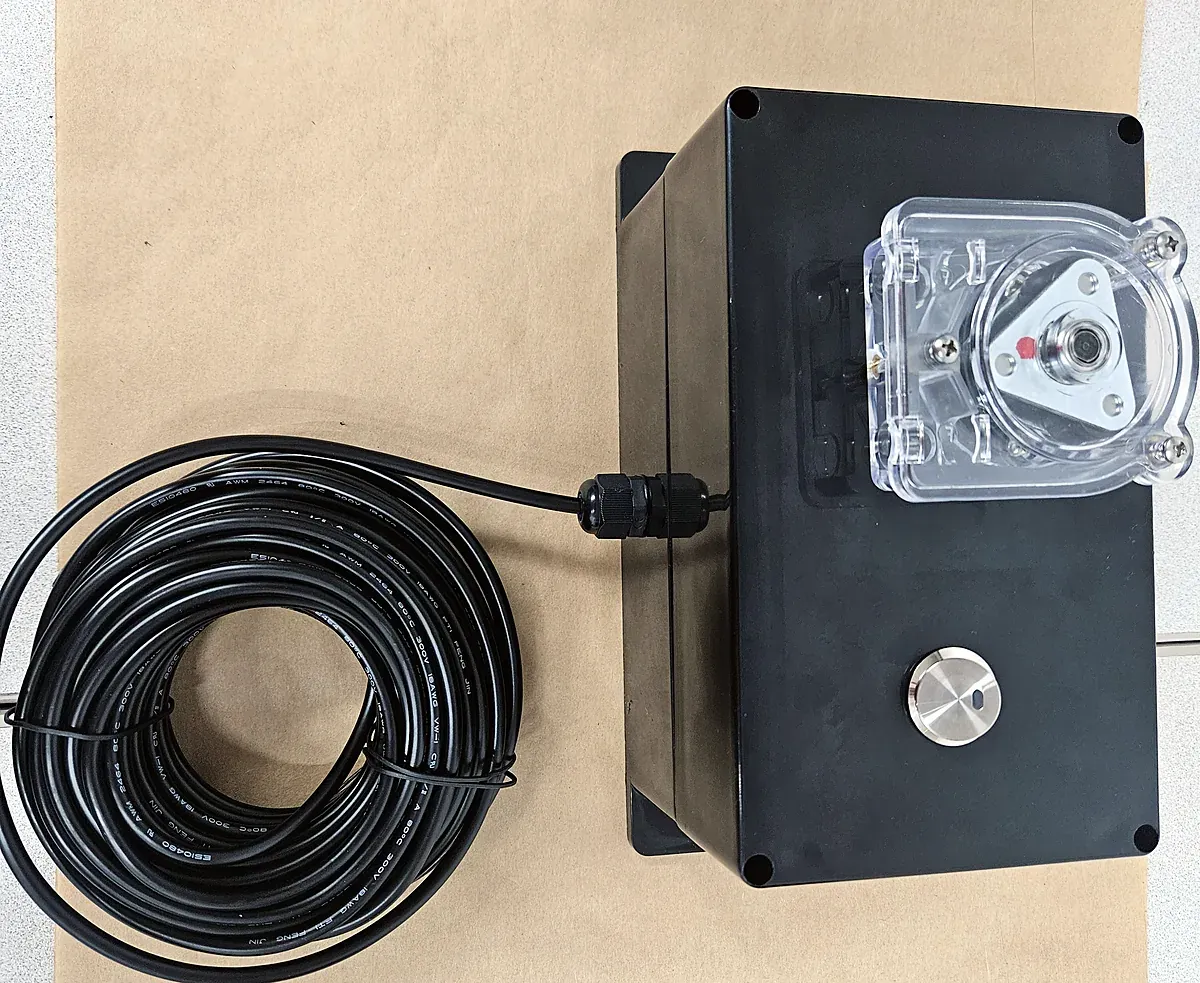
Assembled pump box, ready to mount.
Option: plug-in power instead of the reactor tap
Steps 5 and 6 power the pump from inside the reactor, so it switches on and off with the machine. If you’d rather not open the reactor’s electrical cabinet, skip both steps and power the pump box from a wall outlet instead.
- Supply: Mean Well GST60A24-P1J. A sealed 24 V, 2.5 A brick with a grounded IEC C14 inlet and 90–264 VAC input. Same headroom over the pump’s 1.5 A rating as the cabinet supply, with nothing exposed.
- Cord: a standard grounded computer cord, NEMA 5-15P to IEC C13. The supply doesn’t come with one.
- Connection: the brick ends in a 5.5 × 2.1 mm barrel plug, center positive. Cut the plug off, strip the two output leads, and join them to the 2-conductor cable from the pump box with insulated crimp spade connectors: positive to red, negative to black. Check polarity with a meter before you connect the pump. If you can get the GST60A24-NC version (bare output leads, no plug), there’s nothing to cut.
Everything from the pump box on is wired exactly the same. The one difference in use: the pump no longer shuts off with the reactor. Turn it off at the box switch at the end of the day, or plug the brick into an outlet that’s only live when the rig is running.
Step 5: Tap switched power at the reactor’s disconnect
Power for the 24 V supply comes off the load side of the reactor’s main disconnect (T1 and T2). The pump then only has power when the reactor is on. Never tap the line side: it stays live with the disconnect off.
My E-20 is fed with two hot legs and a ground, with no neutral, so both legs are hot. Each leg gets its own fuse. One fuse on one leg leaves the other 18 AWG conductor protected only by the reactor’s main breaker, which is sized for the whole machine, not for this small wire. I used 2 A slow-blow, 5×20 mm fuses in inline holders. Slow-blow because a switching supply has an inrush that will pop a fast fuse.
Keep the unfused stubs from the disconnect to the fuse holders short (under 12 in) and secured so they can’t chafe. Use 600 V-rated wire on the AC side.
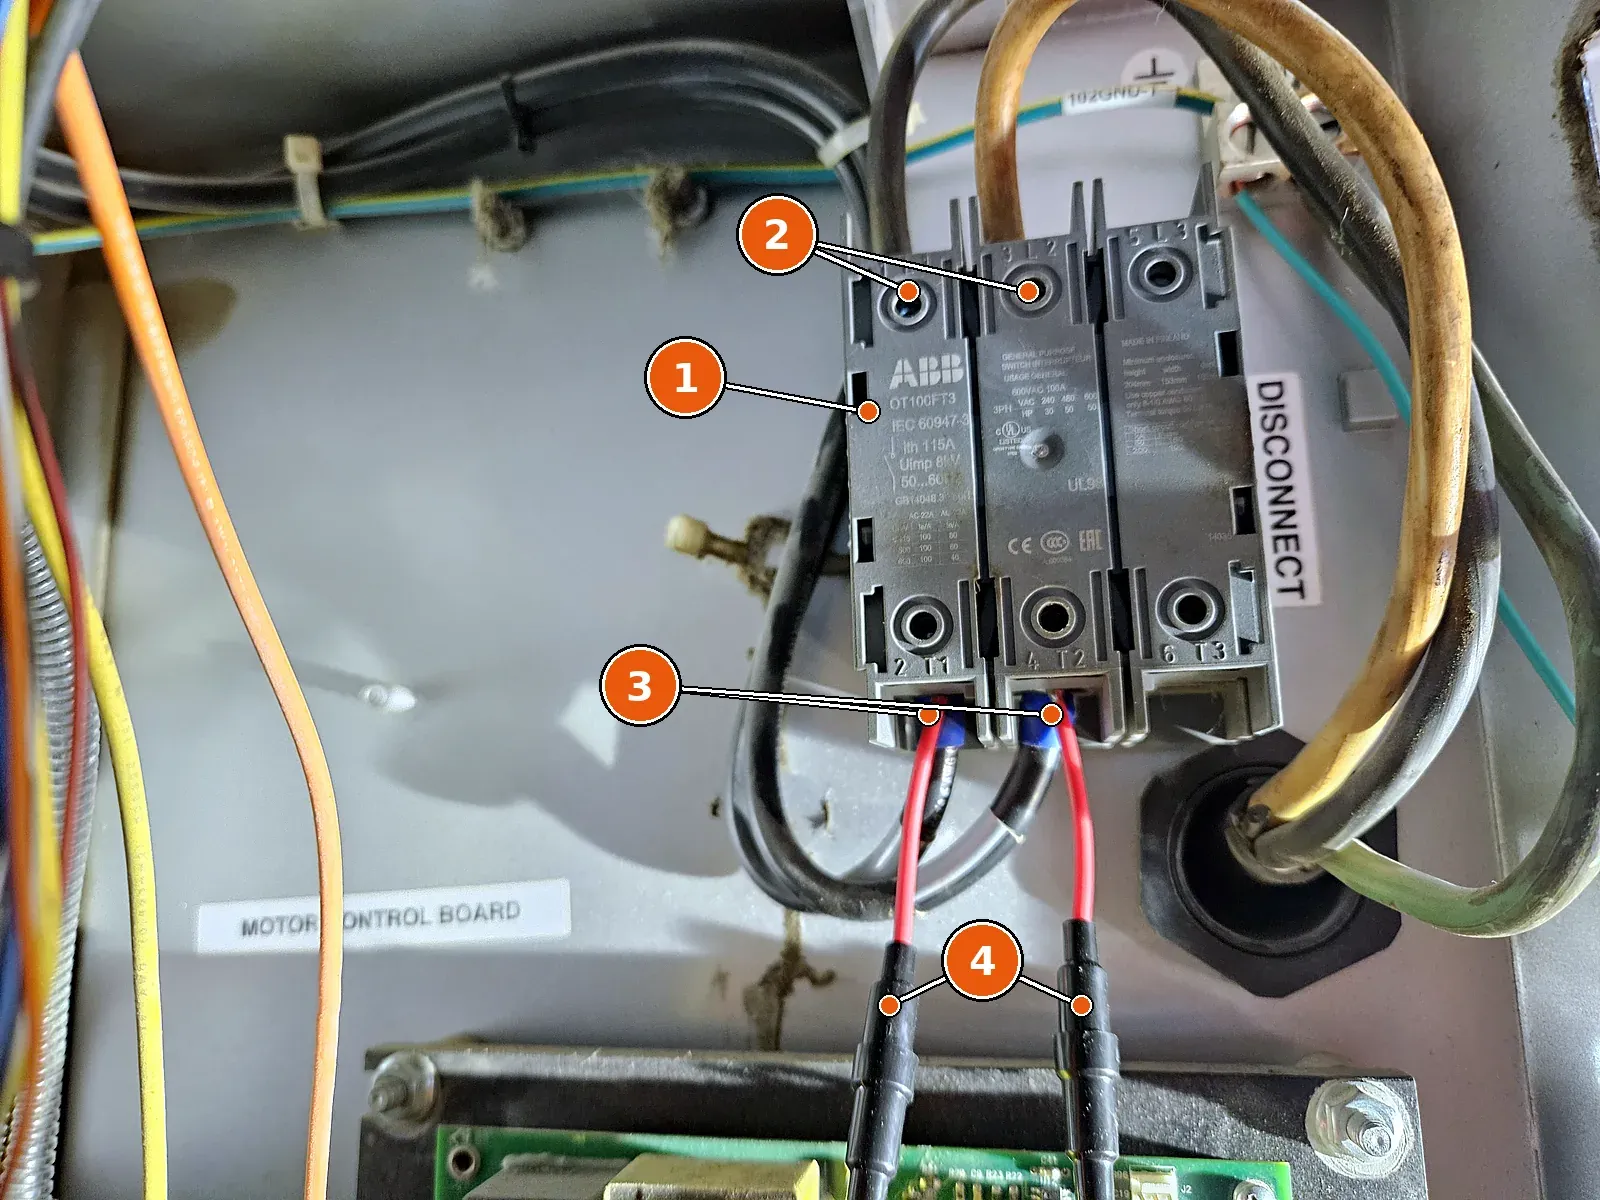
Power comes off the load side of the main disconnect, so the pump only runs when the reactor is on.
- 1. Reactor main disconnect
- 2. Line side: live even with the disconnect off. Don't tap here.
- 3. Load-side taps on T1 and T2
- 4. Inline fuses, one per leg
Step 6: Mount the 24 V supply
The LRS-50-24 is an open-frame supply with exposed screw terminals, so it belongs inside an enclosure. The reactor’s electrical cabinet already is one. It takes 100–240 VAC, so it runs straight off 230 V with no selector to set. It puts out 24 V at 2.2 A, comfortably above the pump’s 1.5 A rating.
- L and N from the two fused legs (the supply doesn’t care which leg goes where)
- Ground to the cabinet ground
- −V and +V out on the 2-conductor cable to the pump box
No DC fuse is needed. The supply has built-in short-circuit and overload protection.
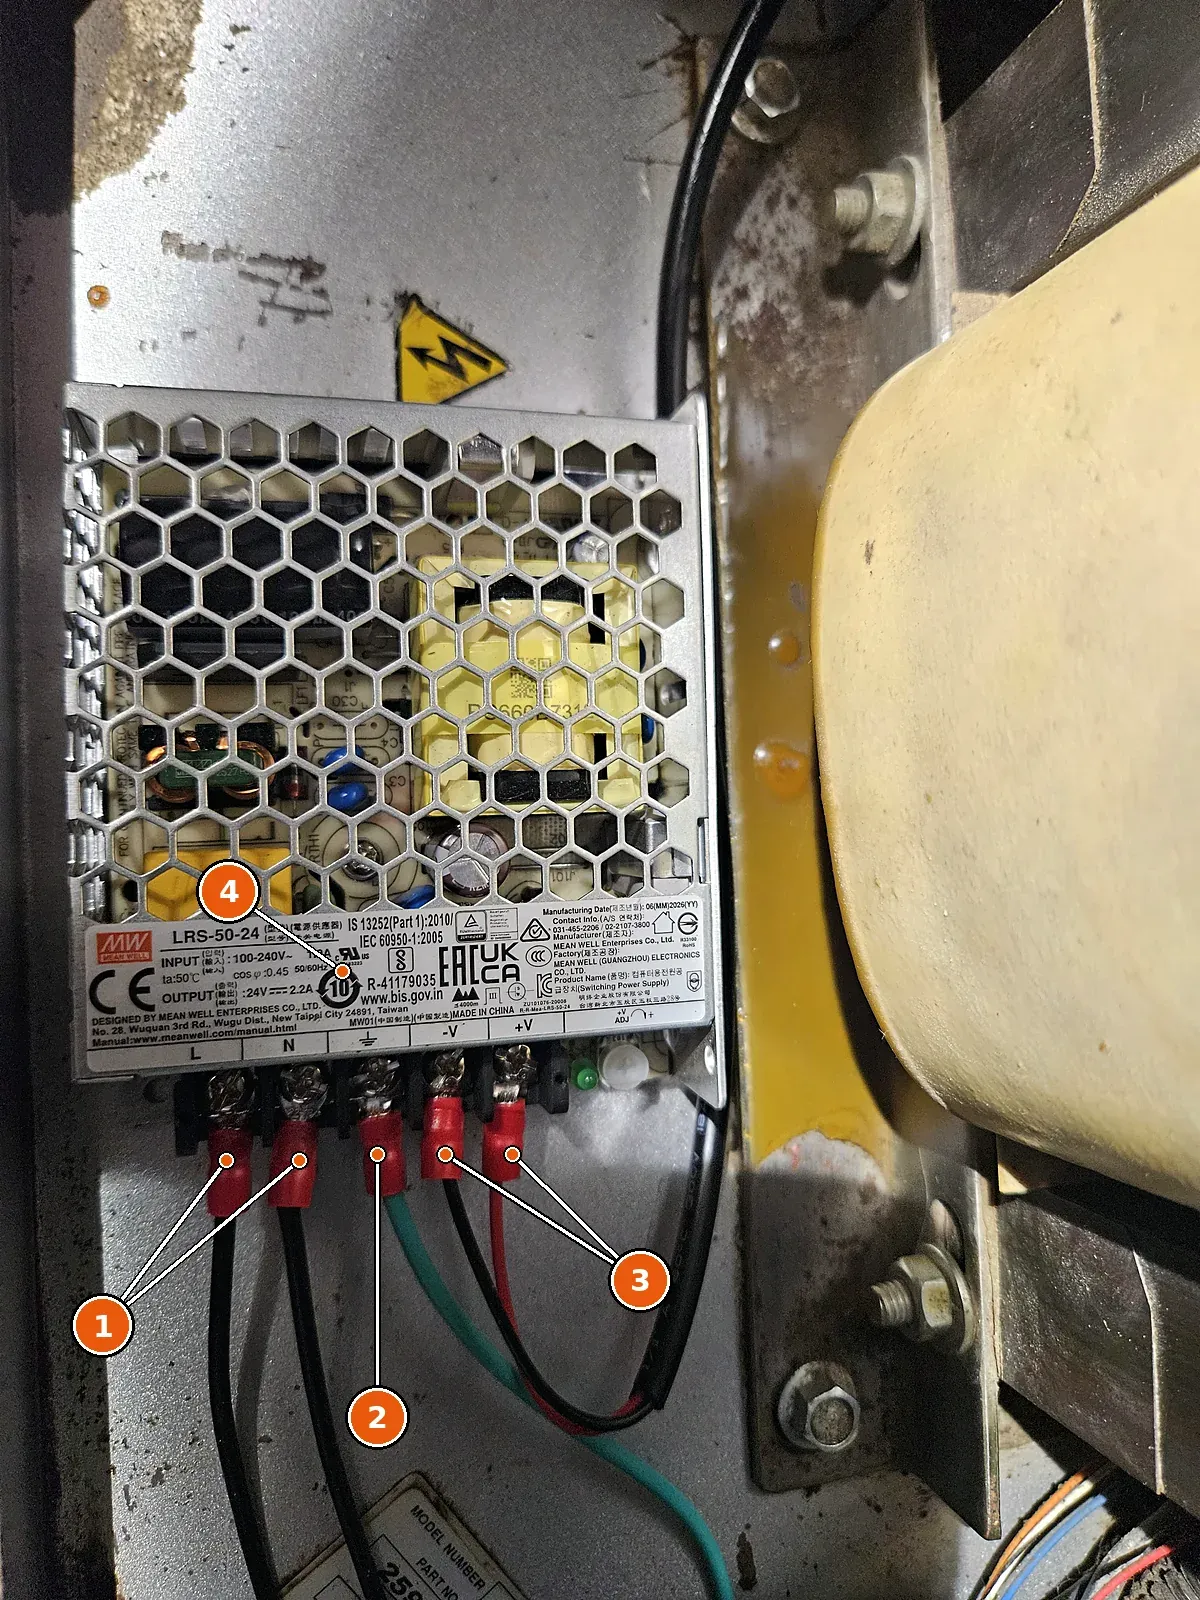
The 24 V supply mounted inside the reactor's electrical cabinet.
- 1. L and N from the fused taps
- 2. Ground to the cabinet
- 3. −V and +V out to the pump box
- 4. Mean Well LRS-50-24: 100–240 VAC in, 24 V / 2.2 A out
Step 7: Plumb the loop
The A-side wet cup has two ports, directly across from each other at the same height. On my rig, both already had brass barbs from the original TSL lines, so the new lines pushed straight on. The old bottle, its lines, and the check valves that were in them all went in the trash. If your cup’s ports are bare, check the thread size before you buy barbs.
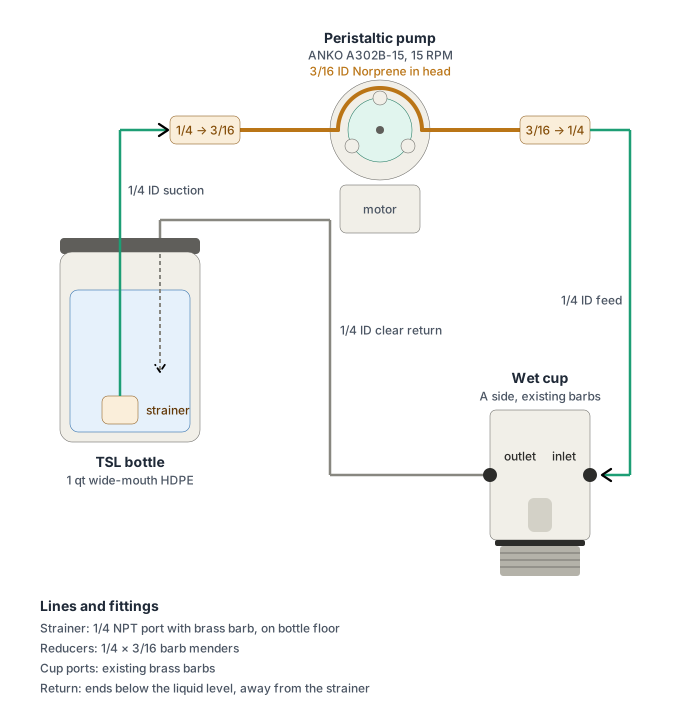
The loop runs:
- From the strainer on the bottom of the bottle, up the 1/4 in suction line. A 1/4 NPT × 1/4 in brass barb threads into the strainer’s port to connect it.
- Through a 1/4 × 3/16 in barb mender into the 3/16 in Norprene drive tube
- Through the pump head
- Out through a second mender, back to 1/4 in clear line, and into one wet cup port
- Out the opposite port and back to the bottle, ending below the liquid level near the bottom of the bottle, away from the strainer
Why the return ends below the liquid. The wet cup works like a plunger: as the rod strokes, the cup’s volume changes, pushing fluid out on one stroke and pulling it in on the next. In the old system, the two opposed check valves turned that into one-way flow, and that was the whole pump.
Removing the check valves doesn’t stop the plunger. It just stops it from producing any net flow. The peristaltic pump’s pinched tube acts as a closed valve on the feed side, so the plunger can only push and pull through the return line. TSL shuttles back and forth in the return line with every stroke and nets out to zero, so the pump alone sets the flow. That back-and-forth is harmless, and it even stirs the TSL around the rod while you spray.
What matters is what the return line pulls on the back stroke. If it ended above the liquid, every pull-back would suck air from the bottle toward the rod. Ending it below the liquid means it only ever pulls TSL.
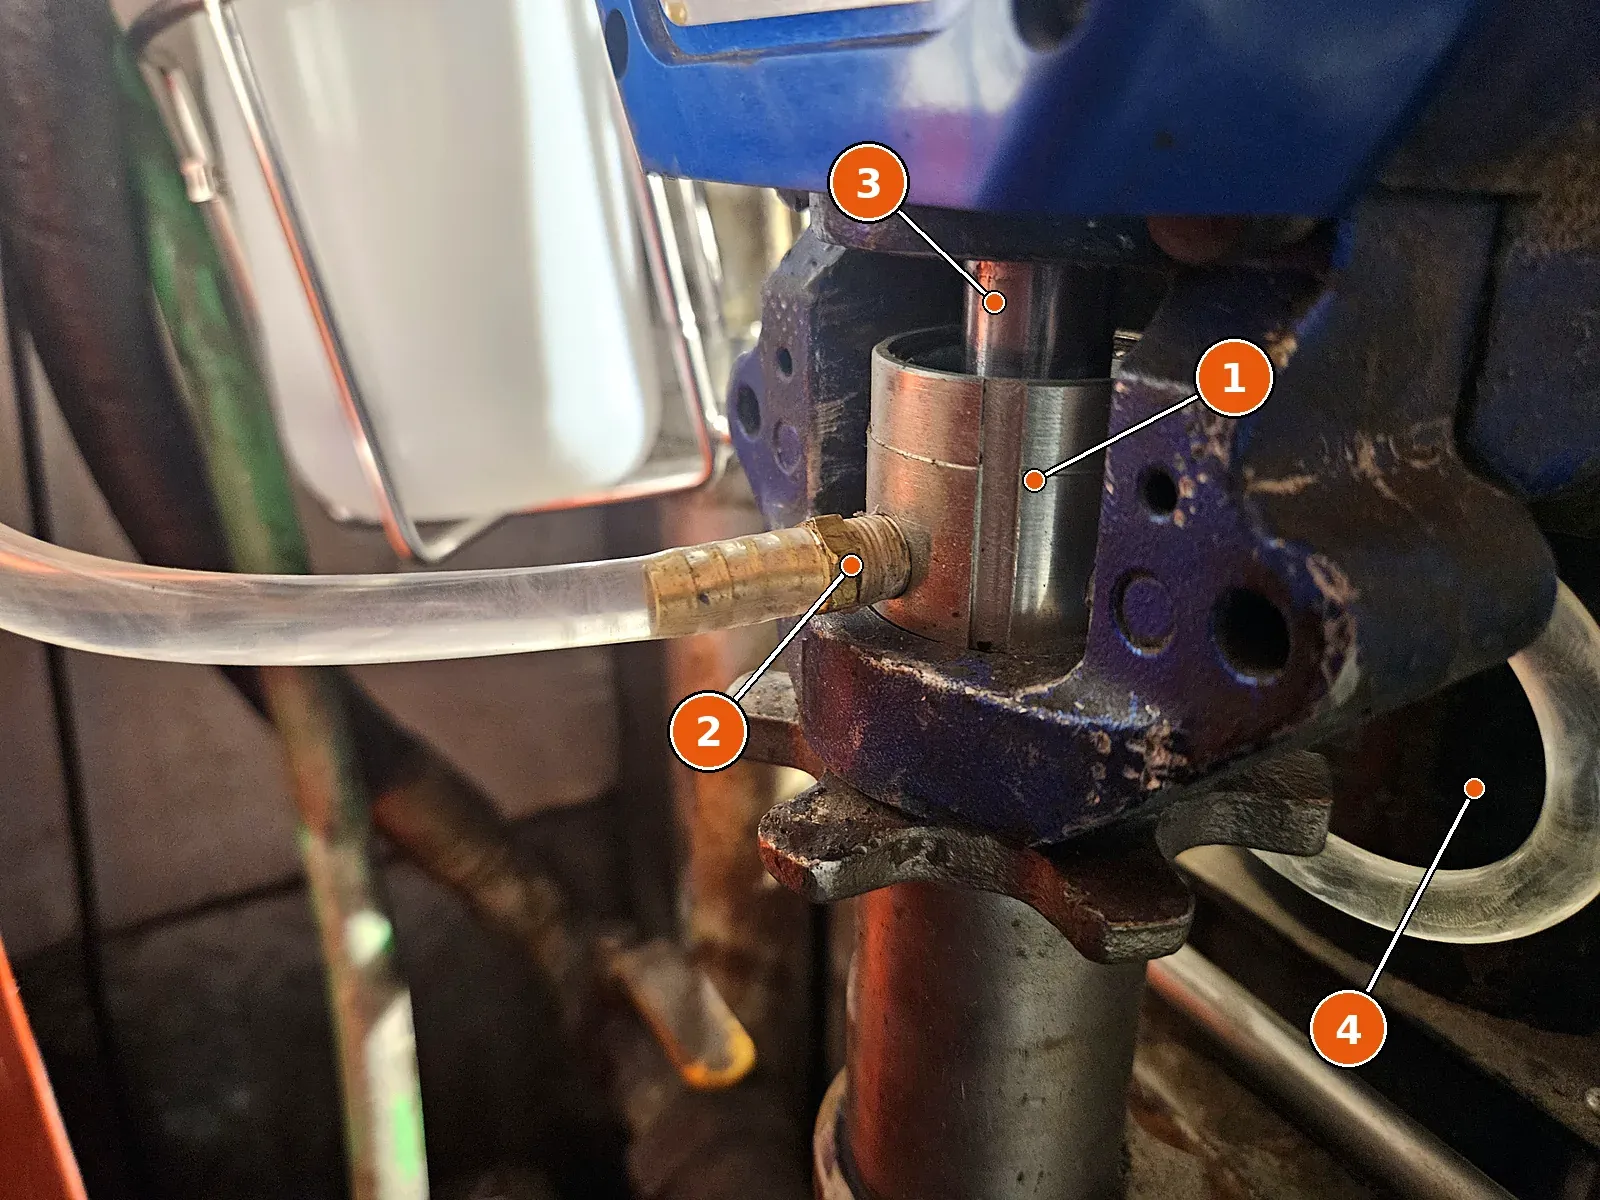
Brass barb in the A-side wet cup, with the clear line attached.
- 1. A-side wet cup
- 2. Brass barb, already in the cup
- 3. Displacement rod
- 4. Line on the opposite port
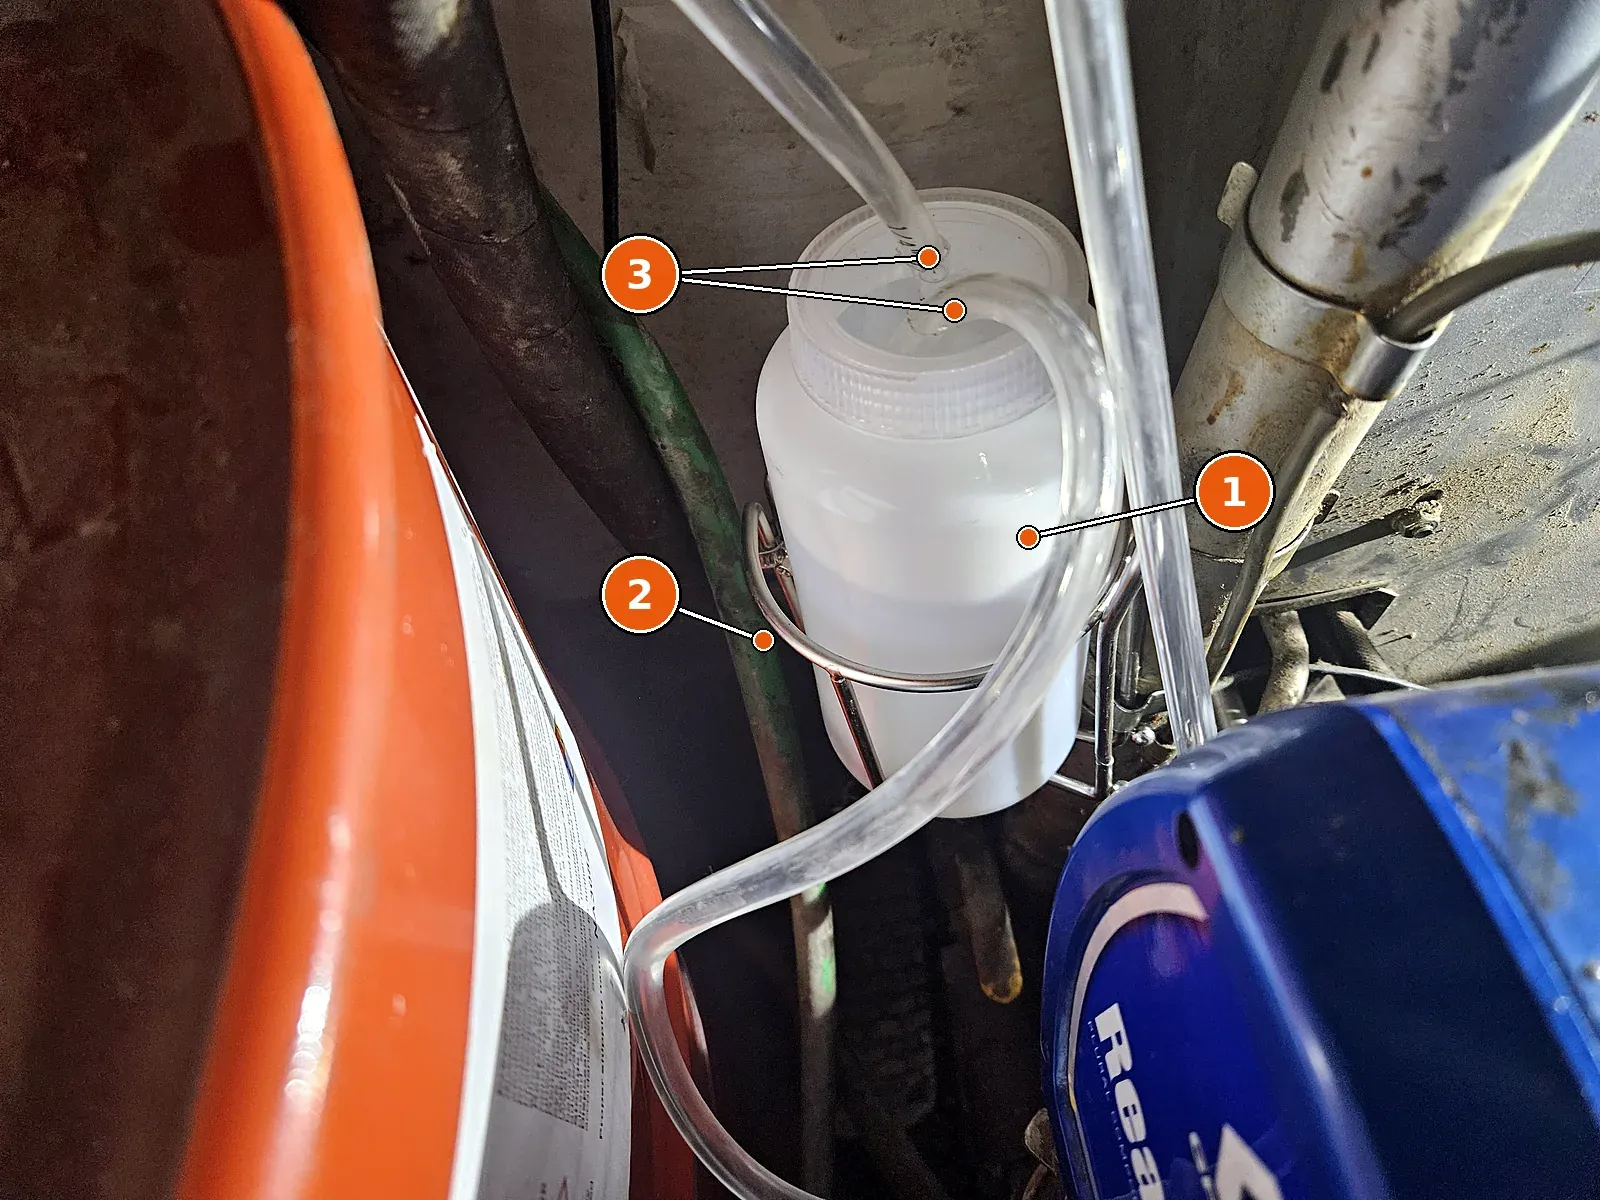
TSL bottle in a stainless holder on the proportioner.
- 1. Wide-mouth HDPE TSL bottle
- 2. Stainless bottle holder
- 3. Suction and return lines through the cap
Step 8: Mount the box and start it up
Mount the box where the tube ports hang straight down and the head is easy to reach. I mounted mine to the plywood above the proportioner. Route the lines without kinks and zip-tie them out of the way.
Fill the bottle, turn the reactor on, and flip the switch. The LED lights and the pump starts. Watch the clear return line. While the rig is spraying, you’ll also see the TSL in it move back and forth with each pump stroke. That’s normal. At about 33 mL/min it takes a few minutes to fill the lines and the cup, then you’ll see TSL coming back to the bottle. If the pump is pulling from the cup instead of the bottle, swap the two lines at the pump.
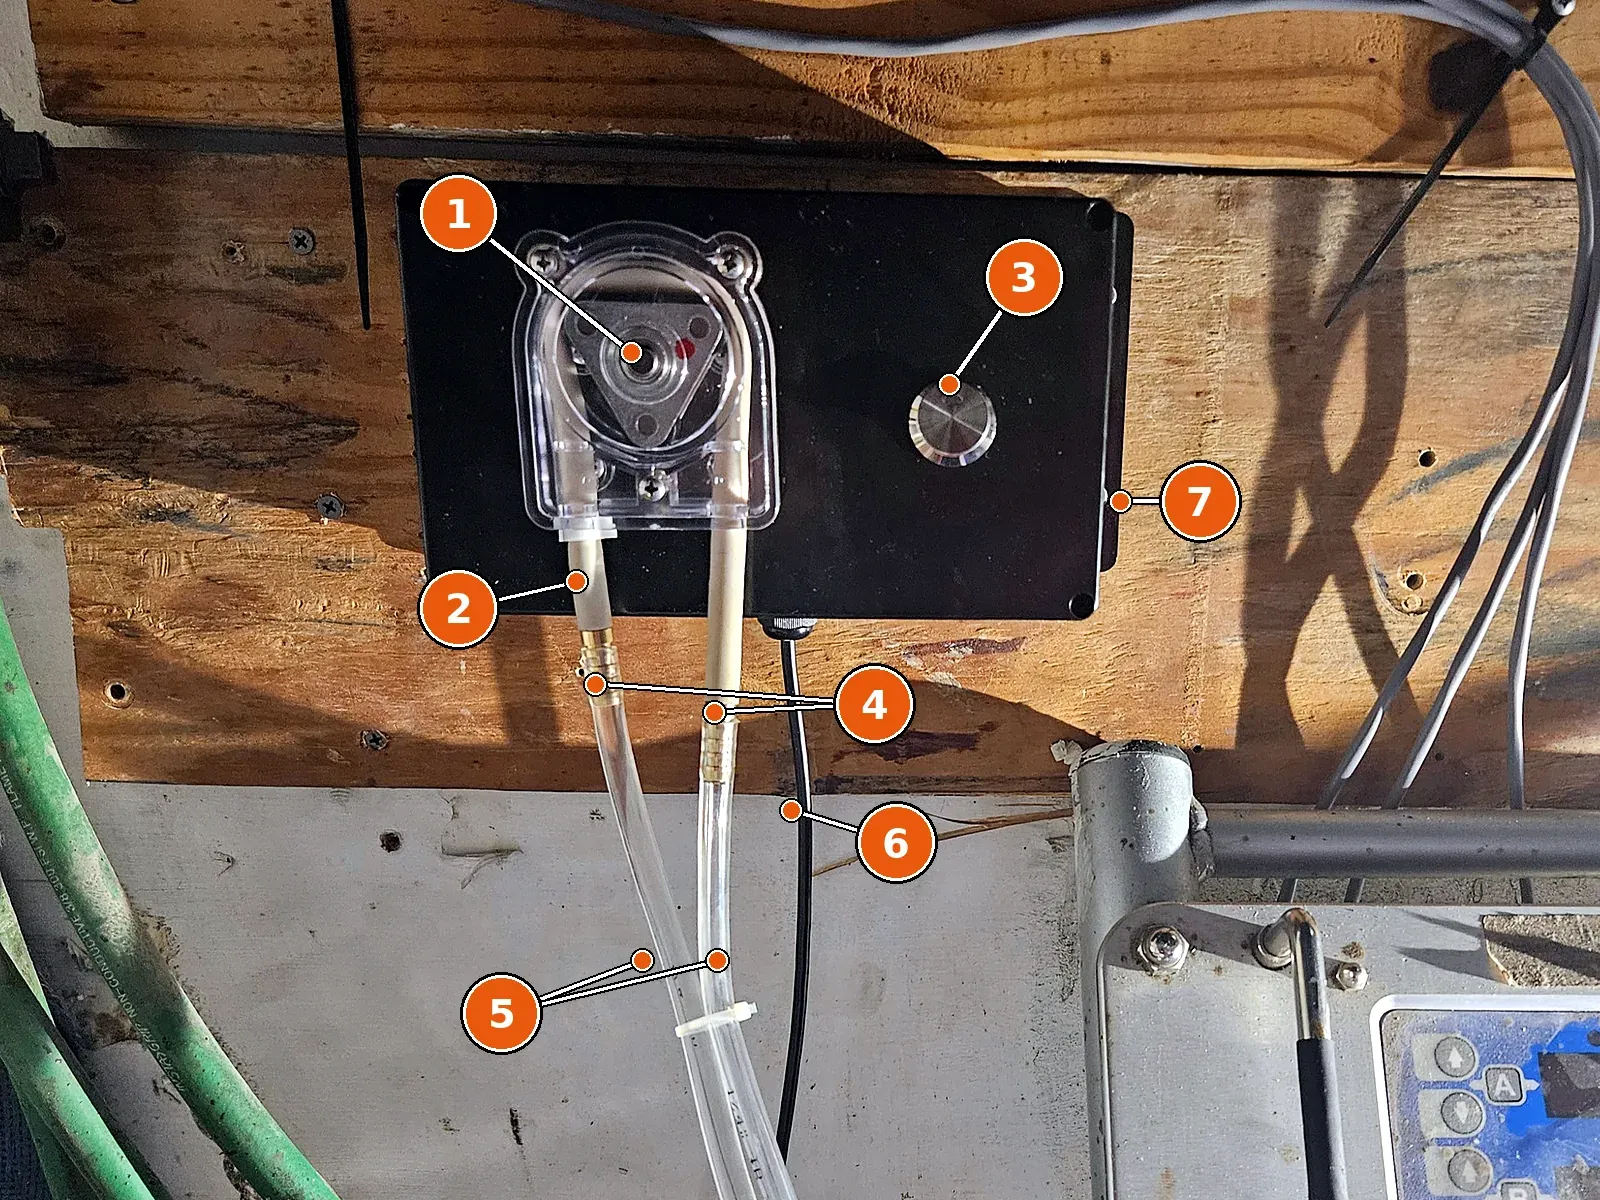
The finished pump box mounted on the rig, above the proportioner.
- 1. Peristaltic pump head
- 2. Norprene drive tube, 3/16 in ID
- 3. Illuminated on/off switch
- 4. Barb menders, 3/16 × 1/4 in
- 5. 1/4 in ID clear lines to the TSL bottle and wet cup
- 6. 24 VDC feed from the reactor cabinet
- 7. Sealed ABS enclosure
Maintenance
- Check the TSL daily. Graco’s guidance is to change it when it gels, darkens, or gets diluted with isocyanate. Graco notes that if your packings are healthy, changing for discoloration shouldn’t be needed more often than every three or four weeks. If you’re changing it much more often than that, look at your throat seal.
- Look at the drive tube at every TSL change. Look for flattening along the roller track or a shiny, worn bore. Replace it on condition, not on hours. Keep a spare on the rig. A starter length comes with the pump; for replacement stock, McMaster-Carr 51075K51 (3/16 in ID × 3/8 in OD) is sold in 10 ft lengths. Don’t use the thinner 5/16 in OD tube; the wall is too thin to occlude properly in a Premium-class head.
- Clean the strainer when you change fluid.
Parts list
| Part | Spec | Qty | Supplier | Unit | Ext. |
|---|---|---|---|---|---|
| Peristaltic pump | ANKO A302B-15 (A300B series, Premium tube class, 15 RPM, 24 V brushless) | 1 | ANKO Products | $175.00 | $175.00 |
| Drive tube | Premium Norprene, 3/16 in bore | 1 | Included with pump | Included | — |
| Replacement drive tube | Tygon rubber blend (Norprene type), black, 3/16 in ID × 3/8 in OD × 3/32 in wall, 10 ft. Must be the 3/8 in OD size. | 1 | McMaster-Carr 51075K51 | $18.00 | Spare |
| 24 VDC power supply | Mean Well LRS-50-24 (24 V, 2.2 A) | 1 | Amazon B019GYODAS | $16.91 | $16.91 |
| Illuminated switch | 22 mm stainless, latching, 2NO, 12–24 V LED, pre-wired | 1 | Amazon B0D75RJZ18 | $9.99 | $9.99 |
| Enclosure | ABS, gasketed, with mounting flange | 1 | Amazon B0CQFYMLKG | $14.99 | $14.99 |
| Cable gland | Nylon gland with locknut | 1 | Included with enclosure | Included | — |
| Power cable | 2-conductor 18 AWG, UL 2464, red/black (roll) | 1 | Amazon B0CN75N643 | $20.99 | $20.99 |
| Inline fuse holders | 5×20 mm, 18 AWG leads | 2 | Amazon B00VLBAF84 | $6.99 / pack | $6.99 |
| Fuses | 2 A slow-blow, 5×20 mm, 250 V | 2 | Local electronics or hardware store | Local | — |
| AC tap wire and terminals | 18 AWG 600 V wire, insulated crimp terminals | 1 | Local / shop stock | Local | — |
| Barb menders | Brass reducing splicer, 1/4 × 3/16 in barb | 2 | Amazon B09ST8Q2R9 | $9.99 / pack | $9.99 |
| Line tubing | Clear PVC, 1/4 in ID × 3/8 in OD, 20 ft | 1 | Amazon B09Y5R8SSL | $8.69 | $8.69 |
| Suction strainer | Miniature suction strainer, 304 stainless screen, PVC body, 1/4 NPT port | 1 | McMaster-Carr 98755K11 | $7.71 | $7.71 |
| Strainer barb | Brass 1/4 NPT male × 1/4 in barb. Threads into the strainer to connect the suction line. | 1 | Amazon (Ailbiuko 15-pc pack) | $9.99 / pack | $9.99 |
| TSL bottle | 32 oz wide-mouth HDPE | 1 | McMaster-Carr 4280T36 | $4.30 | $4.30 |
| Bottle holder | Stainless wire holder with clamp (2-pack) | 1 | Amazon B0BGT7P1DM | $21.12 | $21.12 |
| Total | $306.67 |
Qty is the number of pieces the build needs. Where the price is per pack, one pack covers it; if you buy singles elsewhere, get the full Qty. Prices without a ~ are what I paid. Prices with a ~ are typical retail. Shop around, and expect some movement. Shipping and tax are not included, and neither are TSL fluid, mounting screws, or zip ties. Items marked Spare or Local are not in the total.
Plug-in power option
These three parts replace the Mean Well LRS-50-24, the inline fuse holders, the fuses, and the AC tap wire and terminals in the main list.
| Part | Spec | Qty | Supplier | Unit | Ext. |
|---|---|---|---|---|---|
| 24 VDC plug-in supply | Mean Well GST60A24-P1J (24 V, 2.5 A, C14 inlet, 5.5 × 2.1 mm center-positive plug) | 1 | Amazon B013ETZUS0 | $21.99 | $21.99 |
| AC cord | NEMA 5-15P to IEC C13, grounded | 1 | Amazon / any electronics supplier | ~$6.00 | ~$6.00 |
| Spade connectors | Insulated crimp, male/female pairs, sized for 18 AWG | 2 | Local / shop stock | Local | — |
| Subtotal | ~$27.99 |
Ready-made pump option
The FSP A300 replaces the pump, power supply, switch, enclosure, power cable, fuse holders, fuses, and AC tap wire in the main list. The plumbing parts, from the barb menders down, stay the same.
| Part | Spec | Qty | Supplier | Unit | Ext. |
|---|---|---|---|---|---|
| Ready-made pump | ANKO FSP A300, Premium tube class, 15 RPM (FSP-A30215). Internal 100–240 VAC supply, on/off switch, 6 ft NEMA 5-15P cord, three Norprene drive tubes. | 1 | ANKO Products | ~$399.00 | ~$399.00 |
| Plumbing parts | Barb menders through bottle holder, from the main list | 1 | See main list | $61.80 | $61.80 |
| Total | ~$460.80 |
Sources
- Graco Reactor 3 Proportioning Systems, Operation manual 3A8500
- ANKO A300B OEM peristaltic pump
- ANKO FSP A300 fixed-speed pump system
- ANKO A300B-DH flow rate chart by RPM class and tube bore
- ANKO BLDC pump wire leads guide (PDF)
- Saint-Gobain Norprene Chemical tubing data sheet (tubing life test)
Disclaimer
This post documents what I did on my own rig. It’s for information only: not professional advice, and no warranty. Electrical work must meet your local code, which may require a licensed electrician. Altering the machine can void Graco’s warranty, and Graco hasn’t reviewed or endorsed this build. If you build it, you do so at your own risk.